
Here's a screenshot of just one of the practically-unlimited number of starships that the game can generate:

This is a fully-functional and heavily-armed starship, complete with thrusters, weapons, a cockpit, a reactor, ammo storage, power storage, and crew's quarters.
On the left you can see (click on the screenshot to get a bigger view) a user interface that gives a great amount of power and control over the underlying algorithm that generates the starships. I've included it in these screenshots to help you understand the underlying algorithm.
At a high level, the algorithm works by creating a starship in "stages", which you can see listed on the left with names like "Shape", "Fill Gaps", and "Cockpit". The algorithm starts at the top of the list and processes each stage in sequence. Each stage adds to what was generated by the previous stages, except for of course the first stage which starts from scratch.
Let's walk through each stage in sequence so we can see how the ship gets created stage-by-stage:
Stage 1: "Shape"

In the above screenshot, I've turned off all of the stages except for the very first: the "Shape" stage. On the right you see what the ship looks like (in this case a rough outline of a ship composed entirely of empty "corridor" tiles), and on the left you can see that I've expanded the user interface for this "Shape" stage to give a better view of the inner-workings of this stage.
The sole purpose of this stage is to give a rough outline to the general shape of the ship. Most subsequent stages will obey the shape given by this stage and only place additional parts ("part" being my technical term for discrete rooms, systems, and corridor/armor tiles) within this outline.
The "Shape" stage is actually unlike all the later stages in that it itself is comprised of some number of "shape modules". You can almost think of a shape module as a "brush" from a paint program such as Photoshop in that it defines a "shape" of 1x1 corridor tiles to add to the ship. The two shape modules you can see here are "CircleModule" (which places a blocky circle-like shape of tiles) and "RectangleModule" (which places a rectangular area of tiles).
The "Shape" stage adds somewhere between "MinModules" and "MaxModules" number of random modules (in this case it's always 8 modules), where the chance of any given module being added is determined by its "RandomWeight". Once the modules are chosen, the stage then joins them together in a random configuration and "paints" the resulting shape as corridor tiles.
Stage 2: "Fill Gaps"
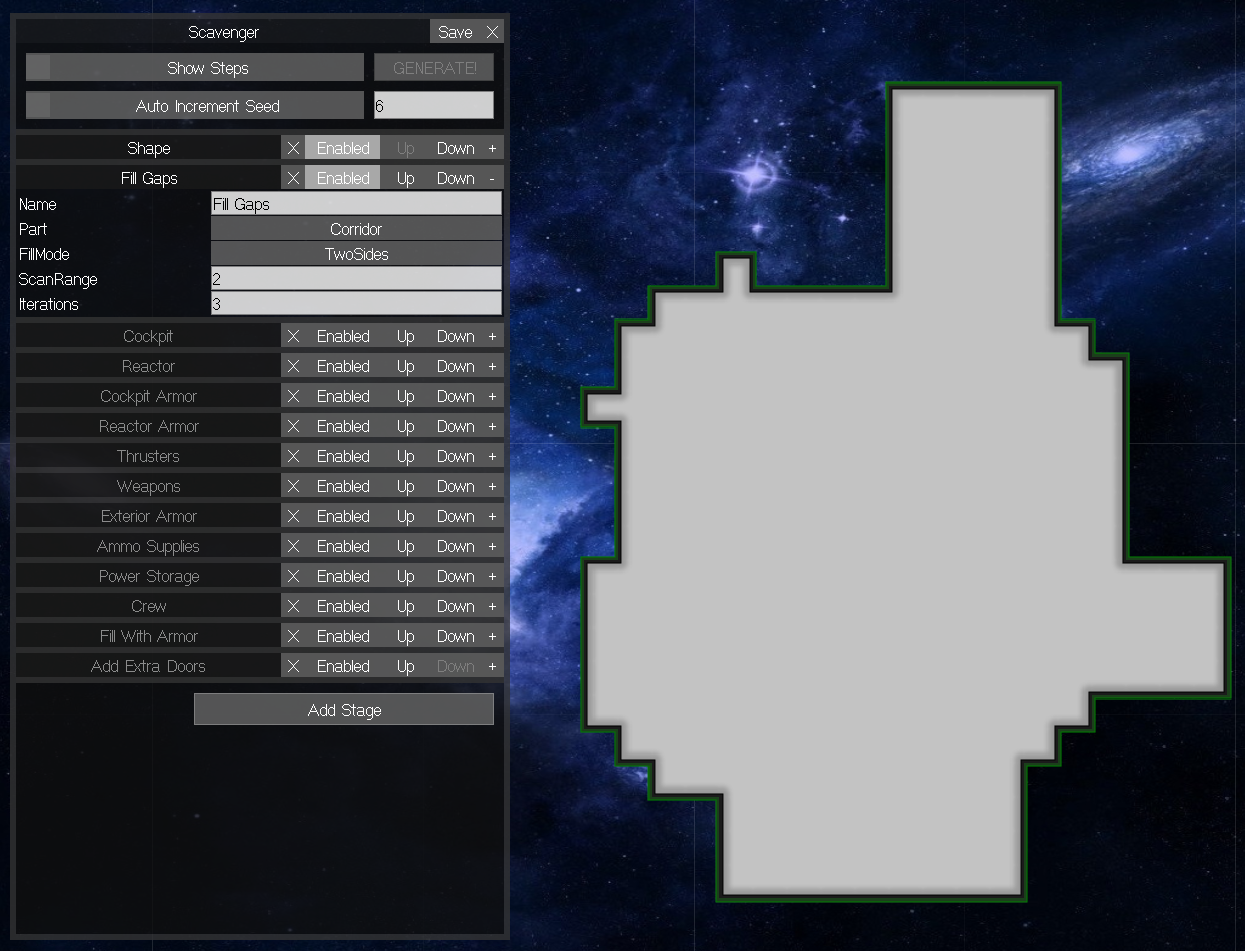
Notice that the result of the first stage left some small gaps and rough edges in the ship. The purpose of this second stage is to fill in those gaps and "even out" the rough edges to give the ship a more solid appearance. While the desire to have ships appear more solid is largely an aesthetic preference (it's perfectly legal to have a ship with holes in it), it does make it easier for the later stages to place new rooms and systems inside the ship. For other styles of ships I may choose to leave out this stage entirely, or even replace it with a stage that carves away bits of the ship in order to make it appear more "stick-like".
The actual logic behind this stage is pretty simple: It simply looks at each empty tile, checks to see if it's surrounded on 2 or more sides by tiles no more than "ScanRange" units away, and if so, fills that empty tile in with another corridor tile. Then it repeats itself (up to "Iterations" number of times) to fill in any more tiles that are newly-eligible to be filled.
Stages 3 & 4: "Cockpit" and "Reactor"
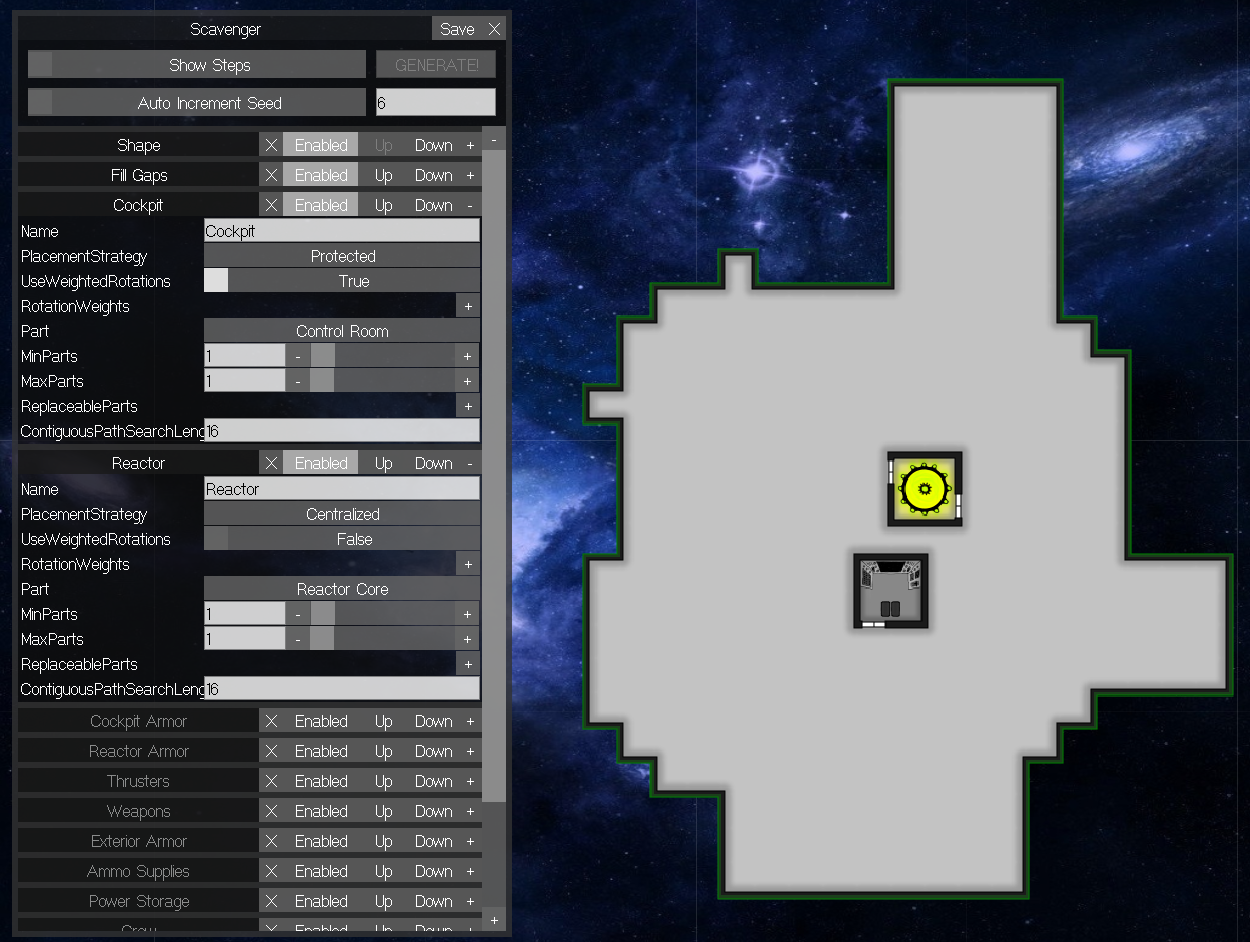
The two most important rooms/systems on any starship are the cockpit and the reactor, so we add those before we add any others. While both the cockpit and the reactor have their own stages, the actual logic of the stages are very similar, so I'll talk about them both at once.
Each of these stages works by iterating through every possible location for the cockpit or reactor and picking the single "best" location for it.
The only difference between the Cockpit and the Reactor stages are in how they define "best". You can see in the user interface that each stage defines a "PlacementStrategy" that is used to determine the best location.
The cockpit uses a "Protected" placement strategy, which simply means that the "best" location for the cockpit is the one that is farthest from the perimeter of the ship. This makes sense since the actual location of the cockpit doesn't affect how well the ship functions, and so we just want to place it in the most difficult-to-destroy location possible.
The reactor uses a "Centralized" placement strategy, which simply means that the reactor will be placed as close to the ship's center of mass as possible. This makes sense since the reactor is most effective when it's in a relatively central and accessible location.
As you can see here, the "best" locations for the cockpit and reactor are often very close or even overlapping. In that case, the cockpit's location preference gets priority simply by virtue of being before the reactor in the list of stages. This explains why the reactor in the above screenshot is somewhat offset from the ship's actual center of mass -- the reactor couldn't be placed in the ideal location because the cockpit was already there, and so it picked the next-best location.
Stages 5 & 6: "Cockpit Armor" and "Reactor Armor":

Since the cockpit and reactor are so important, its usually a good idea to surround them with added protection in the form of armor tiles. These two stages do just that by each finding a part of a specific type and then surrounding that part with one or more layers of armor tiles.
But as you can see in the above screenshot, these stages will usually leave gaps and paths around the parts that they are protecting so that access by the crew to any room or section of the ship isn't cut off. The logic that handles this is crucial to how this and almost every other stage works, so let's talk about...
Path Contiguity Checking
Before any stage picks a location for a new part, it first does what I call a "path contiguity check", which essentially asks the question, "If I place a part here, will I be forcing crew to go too far out of their way to get around me?"
To perform this check, the stage picks any open tile adjacent to the proposed location, and does a quick Dijkstra search to each of the other adjacent tiles. As long as the search finds a path to each other tile no longer than, for example, 5 tiles, then the path contiguity check it considered a success and the part is allowed to be placed there. But if the path fails, then adding a new part to that location would either force the crew to go too far out of their way or would cut off a path entirely, and so the stage will exclude that possible location when deciding where a new part should go.
We can see the practical implications of this check in the above screenshot for stages 5 & 6. Look at, for example, the gap in the armor directly underneath the cockpit where the cockpit's door is located. The "Cockpit Armor" stage didn't place an armor tile there because doing so would have cut off access from the surrounding corridor tiles to the cockpit itself. And the corridor running between the cockpit and the reactor exists because adding an armor tile there would have forced crew to walk all the way around both the cockpit and the reactor to get to the other side.
Stage 7: "Thrusters"

After the Cockpit and Reactor are placed, along with their surrounding armor, the thrusters are placed. There are three sizes of thrusters (small, medium, and big), and this stage is responsible for placing all three.
If you take a look at the U.I. for this stage above, you can see that each size of thruster has a different "score" (1 for small, 2 for medium, and 4 for large), and the stage as a whole can place between 35-45 points worth of thrusters. In addition each size of thruster has a different random "weight", meaning that about 1/6 of the thrusters will be small, 2/6 will be medium, and 3/6 will be large.
The directions of the thrusters are also weighted randomly, so that 5/8 are placed pointing backwards and 1/8 are pointing in each of the other three directions.
Aside from those random weights, there is currently no additional logic (besides randomness) to determine where the thrusters are placed. Even so, randomly-generated ships usually have reasonably well-balanced thruster placements simply by virtue of random probabilities.
Stage 8: "Weapons"

The placement of weapons works almost identically to the placement of thrusters, but with different sizes, scores, and random distributions. (In this case, there are only two sizes of weapons, and their rotations are distributed more evenly around the ship while still favoring weapons that face forward.)
The one algorithmic difference between thrusters and weapons is that, when choosing a location for a weapon, the algorithm will choose the location that is farthest away from the center of the ship in the direction that the weapon is facing.
Stage 9: "Exterior Armor"

Once all the exterior systems (weapons and armor) are placed, a single layer of armor is placed around the perimeter of the ship on any tiles that are already occupied by a weapon or thruster, so long as placing an armor tile there will not block and crew paths according to the above "Path Contiguity Checking" algorithm.
Stages 10 & 11: "Ammo Supplies" and "Power Storage"

Next, Ammo Supply and Power Storage parts are placed. In this case, between 2-3 ammo supplies and 1-2 power supplies are added to the ship.
The algorithm that places these parts attempts to place them in locations that are nearby as many ammo-consuming or power-consuming parts as possible. In the case of ammo supplies, the algorithm will attempt to place them near as many weapons as possible, so long as those weapons aren't already near other ammo supplies. And in the case of power supplies, it places them near thrusters and ammo supplies (which use power to create ammo), so long as those thrusters and ammo supplies aren't near other power supplies or the reactor.
Stage 12: "Crew"

Finally, crew's quarters and bunk rooms are placed in the remaining empty areas. Their placement is completely random, except that the algorithm tries to line up the edges of the rooms if possible, which tends to cause crew's quarters and bunks to be placed adjacent to each other.
Stage 13: "Fill With Armor"

Once all of the crucial rooms and systems have been placed, the almost-final step is to fill any remaining space with armor tiles, because having armor throughout a ship makes it generally harder to destroy.
In order accomplish this, every single empty tile is scanned using the above "Path Contiguity Checking" algorithm to determine whether placing armor there will block any crew paths. If no crew paths will be blocked, then an armor tile is placed.
The neat side-effect of placing armor in this way is that corridors, like the ones you see above, are naturally "created" as a simple by-product not placing armor in locations that would block crew paths!
Stage 14: "Add Extra Doors"

The one final-final step is to place any extra doors in locations that would make crew access significantly more convenient. This is accomplished by scanning every wall location where a door could be placed (but isn't already there) and doing a path search from one side of the wall to the other. If the resulting path is over a certain distance (in this case 10 tiles), then a door is placed to make the path shorter.
In the above screenshot, I can only spot one additional door that was added -- in this case, on the right side of the medium-sized thruster on the bottom of the ship.
Sometimes ship spawn with a guns, but without an ammo suply
ReplyDeleteYou did not think to add modules docking, boarding, landing troops and choice for their weapons, random system of shelters (boxes) and robots of engineers. This is very lacking in this game
ReplyDeleteThe game is not anywhere close to done yet, so stay tuned... Many more awesome features (including boarding troops) are on their way. :-)
DeleteI'm really excited to see new content shaping up :D
ReplyDeleteKeep up the great work, it's amazing how smoothly even this early build runs :)
Hey there
ReplyDeleteThis looks amazing and I hope it is still alive and developing!
Unfortunatly I cant make it run. First was lacking the d3dx9_43.dll file, which I dl and stored at C:\Windows\SysWOW64. But then get this error right at the beginning:
System.Reflection.TargetInvocationException: Exception has been thrown by the target of an invocation. ---> System.BadImageFormatException: Foi efectuada uma tentativa de carregar um programa com um formato incorrecto. (Exception from HRESULT: 0x8007000B)
at SharpDX.Direct3D9.D3DX9.D3DXGetVertexShaderProfile_(Void* arg0)
at SharpDX.Direct3D9.D3DX9.GetVertexShaderProfile(Device deviceRef)
at Halfling.Graphics.D3DShader..ctor(D3DRenderer ren, Byte[] textBytes, String vertexEntryPoint, String pixelEntryPoint)
at Halfling.Graphics.D3DRenderer.CreateShader(Byte[] textBytes, String vertexEntryPoint, String pixelEntryPoint)
at Halfling.Graphics.Renderer.InitDefaultShader()
at Halfling.Graphics.D3DRenderer..ctor(D3DWindow window)
--- End of inner exception stack trace ---
at System.RuntimeMethodHandle.InvokeMethod(Object target, Object[] arguments, Signature sig, Boolean constructor)
at System.Reflection.RuntimeConstructorInfo.Invoke(BindingFlags invokeAttr, Binder binder, Object[] parameters, CultureInfo culture)
at System.Reflection.ConstructorInfo.Invoke(Object[] parameters)
at Halfling.DeviceFactory.CreateRenderer(Window window)
at Starwright.StarwrightApp.CreateRenderer()
at Halfling.Application.Bases.GenericApp.d__0.MoveNext()
at Halfling.Windows.D3DWindow.<>c__DisplayClass3.b__2()
at SharpDX.Windows.RenderLoop.ProxyNativeWindow.Run(RenderCallback renderCallback)
at Halfling.Windows.D3DWindow.ApplicationMain(String[] args, IEnumerable`1 iterator)
at Halfling.Application.Bases.GenericApp.ApplicationMain(String[] args)
at Starwright.StarwrightApp.Main(String[] args)
I guess it is about 32 v 64 bit compability issues, but I am not sure, neither what I should do (if I can do anything at all) to make it run, could you help me?
I am using Win 7 64bit version btw,
Thanks,
that did it! thank you very much for the help. I hope to see further development on this project in the future.
Deletebest regards,
Carlos
Great job, Walt. Thank you very much do not leave the project. I'm waiting for the new content, because your project is very interesting setting and the right approach. Good luck.
ReplyDeleteWhat does the red colored rooms indicate ?
ReplyDeleteThe colored rooms just indicate that the room is operational.
DeleteHello Walt, I'm here to ask you about the game. I'm really fond of your game, and i just want to know about progress on it. I hope you did not abondoned it, cause the game is awesome. The idea is fresh, it wasnt done before! So please reply, thank you.
ReplyDeleteI have definitely not abandoned it, but it *is* a project that I do on the side -- it's not my main job, so it's hard to find time to make a lot of progress on it.
DeleteHi! Thank you for making this amazing game and inspiring me! I have a problem and now whenever I launch it, it immediately crashes and says:
ReplyDeleteSystem.Exception: Could not get constructor for 'Halfling.Graphics.D3DRenderer'.
at Halfling.DeviceFactory.CreateDevice(String dll, String typeName, IArg[] constructorArgs)
at Halfling.DeviceFactory.CreateRenderer(Window window)
at Starwright.StarwrightApp.CreateRenderer()
at Halfling.Application.Bases.GenericApp.d__0.MoveNext()
at Halfling.Windows.D3DWindow.<>c__DisplayClass3.b__2()
at SharpDX.Windows.RenderLoop.ProxyNativeWindow.Run(RenderCallback renderCallback)
at Halfling.Windows.D3DWindow.ApplicationMain(String[] args, IEnumerable`1 iterator)
at Halfling.Application.Bases.GenericApp.ApplicationMain(String[] args)
at Starwright.StarwrightApp.Main(String[] args)
I have tried re-downloading the game, and re-installing Microsoft .Net Framework 4.5.
Please help, thanks!
Hmm, I'm not sure why that's not working for you... What version of Windows are you running?
DeleteI am running windows 8.1
DeleteI did a factory restore and I thought that maybe it was that, but I re-downloaded the game and the drivers and the windows updates and everything. I have no idea what it is, hopefully it will be a simple fix.
Can you post a list of all the files that I should have, maybe something is messing up with the browser or system, thanks!
DeleteNever mind, I downloaded it on another computer and transferred it to this one with a jump/flash drive, and it works, I am so happy right now!
DeleteHuh, that's very strange! I'm glad you got it working, though!
DeleteCan you spot any obvious differences between what you downloaded on the two computers?
I deleted the files for the one on my computer so they would not combine and mess up, however, the owner of the computer I used said that same thing happened with outlook once, no one knew how to fix it then someone came along on the forums and said he downloaded it on a different computer and transferred it over to the computer it didn't work on and it worked, everyone on the forums tried it and it worked and that was that. So it's just a thing that sometimes happens to programs I guess.
DeleteWow, very strange. I hope you don't have a virus or something that is screwing things up!
Deletehahaha, I don't think that's what it is because the first thing I downloaded after factory reset was windows updates, then the Iobit products, then moved Starwright from an external hard drive to my computer, which is probably the reason it messed up.
DeleteThis comment has been removed by the author.
ReplyDeleteAwesome! This is definitely better than the graphics I made! Thanks for sharing!
ReplyDeleteIs there any news. Hopefully the project alive.
ReplyDeleteI haven't been able to work on it much because I've been busy at work, but I still think about this game a lot and certainly don't consider it "dead". Hopefully I'll be able to work on it a lot more soon.
Delete