Tuesday, February 23, 2016

StarWright 0.5.0 - Sounds!

I'm a bit ashamed to say this, but until today no version of StarWright has ever had even a single sound effect. Well it took me a lot longer than I anticipated, but sounds are finally here! (Or should I say hear?) I just released StarWright 0.5.0 which you can download, play, and hear right now!

I had told myself for the longest time that sounds were a lower priority than getting in core gameplay features. I guess that might be true to an extent, but now that I'm playing the game with sounds, I'm really regretting not adding audio months ago, because the game feels much better with sound effects. (And also some accompanying screen-shake effects, which really help to give the sounds some added punch.)

Sound Design


Sounds in StarWright can be grouped broadly into two categories: User interface sounds and gameplay sounds. User interface sounds are easy because they never vary in volume or pitch and always get played whenever the user interacts with the interface. Gameplay sounds on the other hand are much trickier to design and implement because whether they're played, their volume, and sometimes even their pitch depend on what's happening in the gameplay.

Designing gameplay sounds for any game is hard, but StarWright has proven to be by far the hardest sound design challenge I've yet tackled. There are two primary reasons for this challenge:

First, unlike most games where the area that the player can see is relatively constant, in StarWright the scale of the player's view can change dramatically as the player zooms in and out; the player's view can scale from a dozen meters across to a kilometer across or more in a second. What the player hears when zoomed in at 10 meters (the loading of ammo and beeps of controls and charging of lasers) is not what the player should hear at 100 meters (the muted, distant reverb of cannons and thrusters) nor what the player should hear at 1000 meters (the almost-empty yet strangely-beautiful resonance of space).

Many of the more-detailed gameplay sounds (such as beeping controls, loading ammo, and charging weapons) are only audible when zoomed-in near the 10-meter scale; they quickly fade out as the player zooms away. But the louder sounds (such as firing cannons, projectile impacts, and explosions) can be hard at the 100-meter scale as well. However, I wanted these louder sounds to sound more muted and distant when the player is zoomed out, and so each of these sounds is actually authored as two separate sounds; one containing higher-frequency elements that fade out quickly as the player zooms out, and one containing lower-frequency elements that fade out much more slowly. Eventually though, near the 1000-meter scale, no gameplay sounds are audible and the only sound left is the eerie sound of space itself. (Yes, I know space IRL has no sound, but in StarWright it does!)

Sounds don't just fade out as the player zooms out; they also fade out as their point-of-origin moves farther away from the center of the player's view. This works like most games in that more distant sounds are quieter (an enemy shooting you from ten meters away is a lot louder than one shooting at you from a hundred), with the added wrinkle that the distance that a sound can travel increases as the player zooms out the camera. This may seem unnatural, but if the distance didn't scale then the player would either (when zoomed in) be able to hear loudly a lot of sounds from objects they can't see or (when zoomed out) not hear sounds from objects that they can see.

The effect of fading sounds as the player zooms out while simultaneously increasing their audible distance leads to a nice "level of detail" -- that is, when zoomed in, the player hears a relatively small number of higher-pitched, high-details sounds; whereas when zoomed out, the player hears a large number of more muted, less-detailed sounds.

The other big challenge to designing sounds for StarWright is the sheer number of objects that can make sounds. While a typical side-scroller or action game might have a few dozen sound-emitting objects (on screen or near the player) at once, StarWright can have hundreds or even thousands since every weapon, thruster, projectile, explosion, and crew member could be making a sound. And the problem with so many sounds at once (aside from being computationally expensive) is that when they all combine together, too many sounds will start to be like gray noise and the individual details will get lost in the chaos; that's neither pleasant to listen to nor useful information for the player.

My solution is conceptually simple enough: limit the number of gameplay sounds of any single type that can be played at once; the theory being that there should be enough simultaneous sounds that the player won't notice when some don't play while also not having so many sounds that they just create unrecognizable noise.

Gameplay sounds in StarWright can be subdivided into two general groups: One-shot sounds and continuous sounds. One-shot sounds are those that are tied to a particular event happening in the game (such as a cannon firing or a battery being delivered) and are over within a few seconds. Continuous sounds loop indefinitely for as long as some state is true (such as while the control room is powered). The ways in which each of these two groups of sounds is limited differs significantly:

For one-shot sounds, there is a simple limit to the number of sounds of any particular type (such as the sound of the regular cannon firing) that can be played simultaneously. (Usually around 3-5 simultaneous sounds, which seems to be about the point at which players will stop noticing when some don't play.) When a one-shot sound is about to be played, the game checks how many other sounds of the same type are playing, and if the maximum number is already reached, it simply doesn't play the sound.

Continuous sounds are a bit more complicated. Any particular type of continuous sound is typically limited to only 1 playing at once. But unlike one-shot sounds, once the limit is reached, any additional continuous sounds will increase the volume of the currently-playing sound. For example, two thruster rumble sounds playing at 0.5 volume will get combined into one thruster rumble sound playing at 1.0 volume.

Sound Implementation


One of the biggest reasons that it took me so long to release 0.5.0 is that I almost completely rewrote my audio-playing code.

StarWright is based on the same codebase that I originally created for my game Tanky-Tank almost a decade ago. At the time, the best API for playing sounds on Windows was DirectSound. However, in the many years since, DirectSound has been obsoleted by the much-more-modern and well-maintained XAudio2 (and on newer systems, DirectSound is actually emulated on top of XAudio2).

When I started working on sounds for StarWright, I started with my old DirectSound-based code, but I quickly ran into some nasty race conditions that would cause crashes in the above-discussed sound-limiting code. These race conditions were going to be very difficult if not impossible to work around, and so I chose to spend a few days rewriting all of my audio code to use XAudio2 instead of DirectSound.

This rewrite went relatively smoothly, except that I found a few bugs in SharpDX, the C#-language DirectX wrapper I use. I spent at least a day tracking down and then fixing those bugs in SharpDX. (But on the bright side, I had my first-ever GitHub pull request accepted to fix those bugs!)

Screen Shake!


The greatest lesson I've learned in my years as a game developer is that every game is made better by adding screen shake!

While this may be a bit of an exaggeration, it's true enough for StarWright.

You may notice while playing that a lot of explosions and firing sounds are accompanied by a subtle (or not-so-subtle) screen shake effect. They started as kind of a silly experiment but they really added a great sense of weight and power to the louder, more explosion-y sounds. When you get hit by a Large Cannon, it feels quite impactful, and a lot of that has to do with the accompanying screen shake.

Screen shakes work a lot like sounds in the sense that they get weaker as the player zooms out or as the origin gets farther from the center of the screen. (And yes, that distance-to-center is scaled by the zoom, just like sounds.) But unlike sounds, there is only one type of screen shake, and so the magnitudes of all the currently-in-effect screen shakes get added together to determine the final amount by which the screen is actually shaking.

Saturday, January 16, 2016

StarWright 0.4.0 - Laser Blasters!

Today I released version 0.4.0 of StarWright. The big feature of this release is a new weapon: the Small Laser Blaster!

The Small Laser Blaster is an energy weapon that fires pulses of raw energy. Unlike the cannons, the laser blaster draws its power from plasma batteries instead of using ammo that has to be manufactured elsewhere. Compared to the cannons, the laser blaster deals less damage but has a higher rate of fire and is considerably more accurate. Its rounds also cannot penetrate inside enemy ships, unlike the cannons, making it more effective at destroying perimeter systems than interior systems.


Related to the addition of laser blasters, the player now starts with a new class of ship, which I dubbed the Model-1. The Model-1 is a bit smaller than the previous starting-ship, and instead of having two Regular Cannons it has two Small Laser Blasters. I made this change to reduce the number of game mechanics that the player has to learn and understand at the beginning of the game; laser blasters use no ammo, and so the player only has to understand the power mechanic instead of both the power and ammo mechanics. Also, because laser blasters are more accurate than the cannons, new players will be frustrated less by missed shots.


I have also made some major balance & pacing adjustments in this release. First of all, the damage dealt by all weapons has been greatly increased (cannons do more than twice as much damage); a change I made to increase the pace of combat, which I felt was feeling sluggish. Also, the thrusters and the Ammo Factory both use power much more rapidly, which, combined with the power-consuming new laser blasters, makes balancing power usage and providing sufficient reactors & power supplies much more important.

Go ahead and download it now! I welcome all of your feedback!

Monday, January 11, 2016

StarWright 0.3.0 - New Art!

Which much relief, I've finally released version 0.3.0 of StarWright! (Which you can download here.) This release contains a handful of balance changes and, much more exciting, completely revamped art for the ship interiors.

The new art is much more detailed and attractive than the old "art" (which was really just quick "programmer art" sketches). Most of it is even animated! While I don't consider this art to be "final" and I intend to eventually have it replaced by a professional artist, I think it's good enough for (what is currently) a free game. Even so, I welcome your feedback on it if you have any!

Here's a (rather rough) gameplay video featuring the new art:


And a handful of screenshots as well:


Sunday, December 6, 2015

StarWright 0.2.0 series

Since I last posted, I have released not one, not two, but nine new builds of StarWright!

Most of these updates have been to fix bugs that people have found. (Indeed, the game is feeling *much* more stable than 0.1.0 did; there are, literally, no known bugs right now.)

One of those nine new builds was 0.2.0, which includes not just bug fixes but also a handful of other improvements. Here's a summary of the juiciest bits:

  • When a part is destroyed, it no longer spawns one structure piece occupying the entire area of the destroyed part. It now spawns one structure piece per tile, each of which can be destroyed individually. This looks better than stretching the structure graphic over the entire area of the original part, and it feels less weird as well. It also paves the way for some future features I want to add that relate to being able to watch a ship build to your specifications rather than it updating instantly.
  • Probably the biggest usability issue of the previous versions was that, in order to target a specific part of an enemy ship, you had to hold the alt key while right-clicking on the part you wanted to target. This was not intuitive, and the only way you could figure it out was either accidentally or reading the online bullet points that substitute for not having a manual. So now you no longer have to hold the 'alt' key to target a specific part. Simply right-click to target an enemy ship, and then right-click again on a specific part to target that part.
  • In order to destroy an enemy ship in the regular Bounty mode, you now only have to destroy its Reactor instead of both the Reactor and Control Room. I think that it was confusing having to destroy both, and players have told me that they find the reactor a more naturally explosive target. Plus, only having to destroy the reactor makes taking out the control room first a more interesting decision.

There's tons more changes and fixes, almost all of which I list in the patch notes.

I'll leave you with this screenshot of one of my favorite ships I've made:


Tuesday, November 24, 2015

StarWright 0.1.0 - Bounties & Blueprints!

At long last (more than a year and a half!) I finally have a brand-new version of StarWright available for you to download and (hopefully!) enjoy, and it's a doozy of an update: StarWright 0.1.0. I consider this the first "non-prototype" version of the game, since it now has some amount of actual challenge and progression.

The changelog lists most of the improvements since the last prototype version, but I'll outline here the biggest new features...

The first big feature is what I call Bounty Mode. Just start up the game and hit the New Game button. You'll start the game with a small ship just like this one:


You start the game with 5000 credits, which if you want you can immediately use to make some upgrades to your ship, though you won't be able to afford much more than a cannon and another couple crew.

In order to earn more credits, you'll need to fight and defeat enemy ships. They're listed under the BOUNTIES in the top-right along with the reward for defeating each ship, and there will also be an arrow pointing in the direction of any enemy ship off-screen. Many of the bounties you may see will be too difficult to defeat without upgrading your ship first.

Once you defeat an enemy ship (specifically, by destroying its Control Room and Reactor), you'll earn a substantial credit reward, which you should use to repair any damage to your ship and, if you have any credits left over, make further improvements to your ship such as adding more cannons, thrusters, and crew.

In order to make upgrades to your ship (or even repair it), you'll utilize the other big feature: Blueprints. Click on the "Blueprints" button in the bottom-left corner, and you'll be presented with a U.I. that looks something like this:


(This screenshot is from much later in the game after the playing has already upgraded their ship many times.)

When this U.I. is displayed, you're not actually modifying your ship itself; you're modifying its blueprints. The cool thing about blueprints is that you can edit and tweak them as much as you want at no cost, only paying the required credits once you're actually happy with your design and want to commit to it. And the other cool thing about blueprints is that, if your ship takes damage and has parts of it destroyed, the blueprints are unaffected, making it easy to restore your ship to its intended design.

When you're satisfied with your design and want to commit to it, simply press the MAKE IT SO button in the bottom right. As long as you have enough credits, your ship will be updated to match the blueprints, and the required funds will be deducted from your account.

Once you've upgraded your ship, you can fly off and attempt to defeat one of the enemy bounties:


Simply right-click on the enemy ship to attack it. Hold the alt key and right-click on a specific part of an enemy ship to concentrate fire on that specific part. (I recommend usually taking out the weapons and ammo supplies first, unless its Control Room or Reactor is especially vulnerable.)

The enemy ships will try their best to shoot you from their best side and will occasionally maneuver to hit you from another position. If you disarm them, then they'll try to run away, so you may want to consider taking out their engines or Control Room to prevent that.

And lastly, we have to say a sad goodbye to an old feature that I have decided to remove to make developing the rest of the game easier.... Goodbye, multiplayer. :(  I removed multiplayer because its presence was making the game's code far more complicated than it otherwise would be and was greatly slowing down the development of the primary singleplayer mode of play. It's possible that some sort of multiplayer "my ship versus your ship" mode will return in the future, but for now I've decided to remove multiplayer from StarWright.

Please feel free to download the game. I welcome all of your feedback!

Friday, April 18, 2014

Procedurally Generated Starships in StarWright

I've been working on the main singleplayer (& co-op) "explorable universe" mode for StarWright. This mode is still a ways off, but in the meantime I'd like to share something with you that I think is pretty neat: the "random starship generator" that the singleplayer mode will use to generate an unlimited variety of enemy starships for you to fight. (You can play with these procedurally-generated starships in the "sandbox" mode of the latest version of StarWright.)

Here's a screenshot of just one of the practically-unlimited number of starships that the game can generate:


This is a fully-functional and heavily-armed starship, complete with thrusters, weapons, a cockpit, a reactor, ammo storage, power storage, and crew's quarters.

On the left you can see (click on the screenshot to get a bigger view) a user interface that gives a great amount of power and control over the underlying algorithm that generates the starships. I've included it in these screenshots to help you understand the underlying algorithm.

At a high level, the algorithm works by creating a starship in "stages", which you can see listed on the left with names like "Shape", "Fill Gaps", and "Cockpit". The algorithm starts at the top of the list and processes each stage in sequence. Each stage adds to what was generated by the previous stages, except for of course the first stage which starts from scratch.

Let's walk through each stage in sequence so we can see how the ship gets created stage-by-stage:

Stage 1: "Shape"


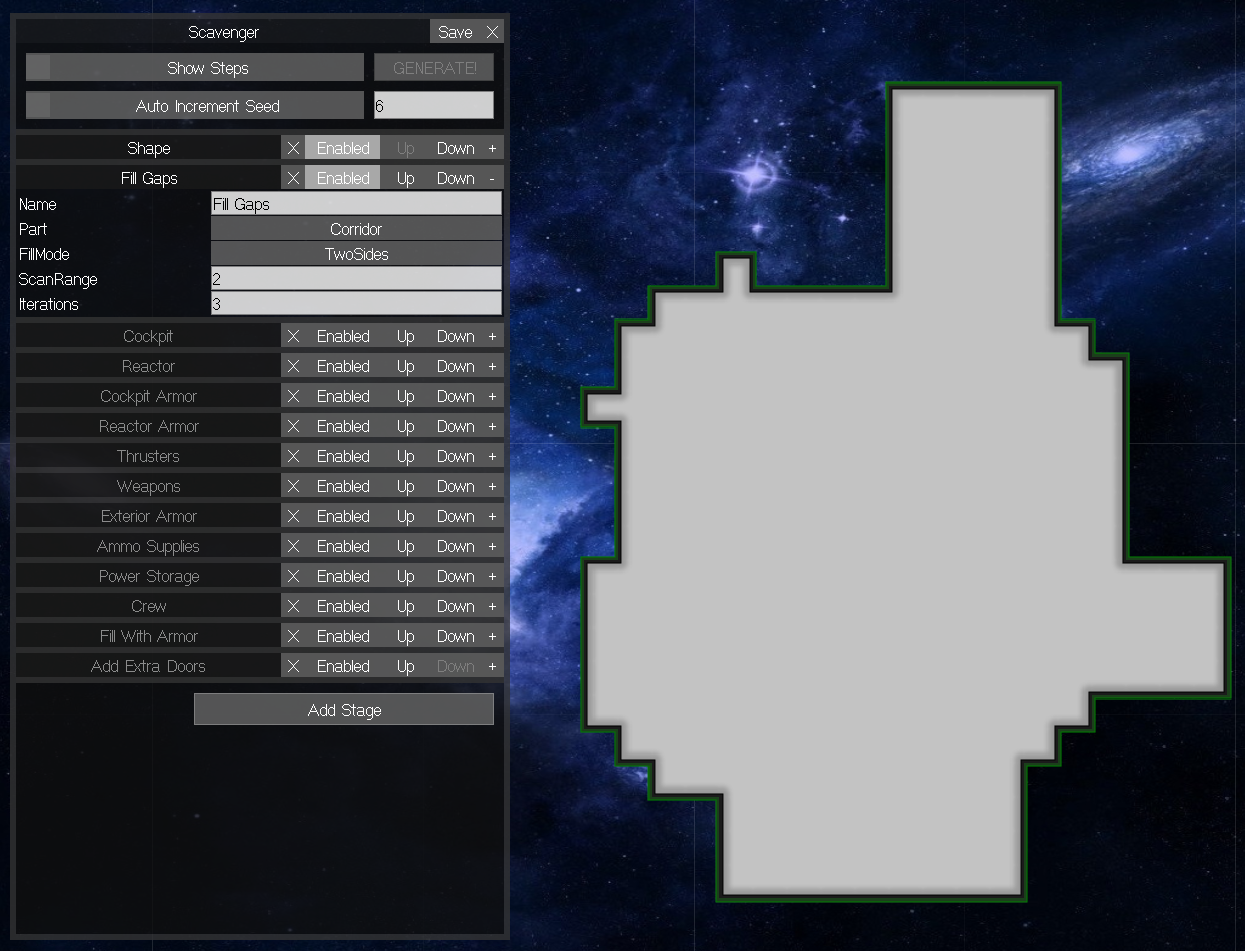
In the above screenshot, I've turned off all of the stages except for the very first: the "Shape" stage. On the right you see what the ship looks like (in this case a rough outline of a ship composed entirely of empty "corridor" tiles), and on the left you can see that I've expanded the user interface for this "Shape" stage to give a better view of the inner-workings of this stage.

The sole purpose of this stage is to give a rough outline to the general shape of the ship. Most subsequent stages will obey the shape given by this stage and only place additional parts ("part" being my technical term for discrete rooms, systems, and corridor/armor tiles) within this outline.

The "Shape" stage is actually unlike all the later stages in that it itself is comprised of some number of "shape modules". You can almost think of a shape module as a "brush" from a paint program such as Photoshop in that it defines a "shape" of 1x1 corridor tiles to add to the ship. The two shape modules you can see here are "CircleModule" (which places a blocky circle-like shape of tiles) and "RectangleModule" (which places a rectangular area of tiles).

The "Shape" stage adds somewhere between "MinModules" and "MaxModules" number of random modules (in this case it's always 8 modules), where the chance of any given module being added is determined by its "RandomWeight". Once the modules are chosen, the stage then joins them together in a random configuration and "paints" the resulting shape as corridor tiles.

Stage 2: "Fill Gaps"


Notice that the result of the first stage left some small gaps and rough edges in the ship. The purpose of this second stage is to fill in those gaps and "even out" the rough edges to give the ship a more solid appearance. While the desire to have ships appear more solid is largely an aesthetic preference (it's perfectly legal to have a ship with holes in it), it does make it easier for the later stages to place new rooms and systems inside the ship. For other styles of ships I may choose to leave out this stage entirely, or even replace it with a stage that carves away bits of the ship in order to make it appear more "stick-like".

The actual logic behind this stage is pretty simple: It simply looks at each empty tile, checks to see if it's surrounded on 2 or more sides by tiles no more than "ScanRange" units away, and if so, fills that empty tile in with another corridor tile. Then it repeats itself (up to "Iterations" number of times) to fill in any more tiles that are newly-eligible to be filled.

Stages 3 & 4: "Cockpit" and "Reactor"


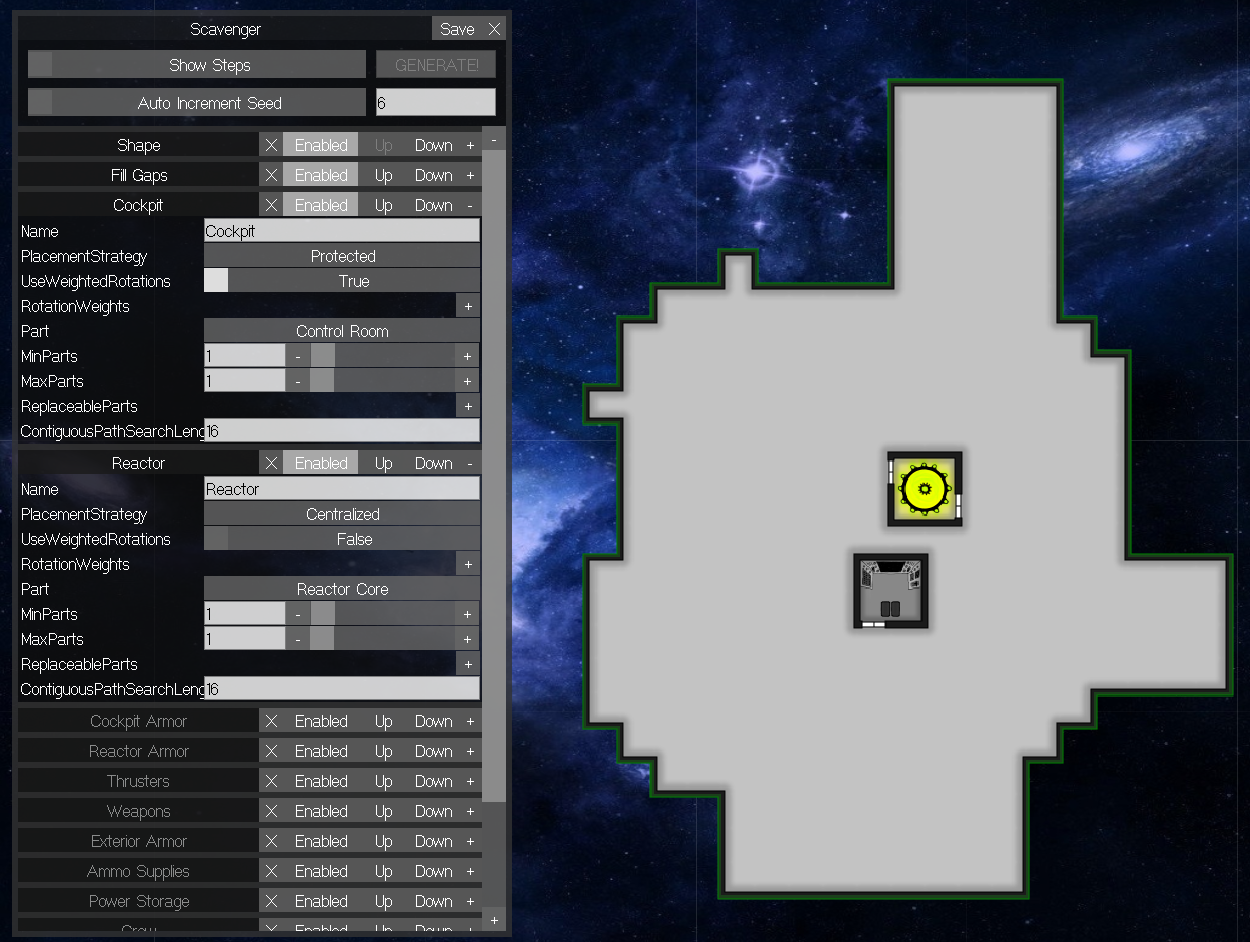
The two most important rooms/systems on any starship are the cockpit and the reactor, so we add those before we add any others. While both the cockpit and the reactor have their own stages, the actual logic of the stages are very similar, so I'll talk about them both at once.

Each of these stages works by iterating through every possible location for the cockpit or reactor and picking the single "best" location for it.

The only difference between the Cockpit and the Reactor stages are in how they define "best". You can see in the user interface that each stage defines a "PlacementStrategy" that is used to determine the best location.

The cockpit uses a "Protected" placement strategy, which simply means that the "best" location for the cockpit is the one that is farthest from the perimeter of the ship. This makes sense since the actual location of the cockpit doesn't affect how well the ship functions, and so we just want to place it in the most difficult-to-destroy location possible.

The reactor uses a "Centralized" placement strategy, which simply means that the reactor will be placed as close to the ship's center of mass as possible. This makes sense since the reactor is most effective when it's in a relatively central and accessible location.

As you can see here, the "best" locations for the cockpit and reactor are often very close or even overlapping. In that case, the cockpit's location preference gets priority simply by virtue of being before the reactor in the list of stages. This explains why the reactor in the above screenshot is somewhat offset from the ship's actual center of mass -- the reactor couldn't be placed in the ideal location because the cockpit was already there, and so it picked the next-best location.

Stages 5 & 6: "Cockpit Armor" and "Reactor Armor":


Since the cockpit and reactor are so important, its usually a good idea to surround them with added protection in the form of armor tiles. These two stages do just that by each finding a part of a specific type and then surrounding that part with one or more layers of armor tiles.

But as you can see in the above screenshot, these stages will usually leave gaps and paths around the parts that they are protecting so that access by the crew to any room or section of the ship isn't cut off. The logic that handles this is crucial to how this and almost every other stage works, so let's talk about...

Path Contiguity Checking

Before any stage picks a location for a new part, it first does what I call a "path contiguity check", which essentially asks the question, "If I place a part here, will I be forcing crew to go too far out of their way to get around me?"

To perform this check, the stage picks any open tile adjacent to the proposed location, and does a quick Dijkstra search to each of the other adjacent tiles. As long as the search finds a path to each other tile no longer than, for example, 5 tiles, then the path contiguity check it considered a success and the part is allowed to be placed there. But if the path fails, then adding a new part to that location would either force the crew to go too far out of their way or would cut off a path entirely, and so the stage will exclude that possible location when deciding where a new part should go.

We can see the practical implications of this check in the above screenshot for stages 5 & 6. Look at, for example, the gap in the armor directly underneath the cockpit where the cockpit's door is located. The "Cockpit Armor" stage didn't place an armor tile there because doing so would have cut off access from the surrounding corridor tiles to the cockpit itself. And the corridor running between the cockpit and the reactor exists because adding an armor tile there would have forced crew to walk all the way around both the cockpit and the reactor to get to the other side.

Stage 7: "Thrusters"


After the Cockpit and Reactor are placed, along with their surrounding armor, the thrusters are placed. There are three sizes of thrusters (small, medium, and big), and this stage is responsible for placing all three.

If you take a look at the U.I. for this stage above, you can see that each size of thruster has a different "score" (1 for small, 2 for medium, and 4 for large), and the stage as a whole can place between 35-45 points worth of thrusters. In addition each size of thruster has a different random "weight", meaning that about 1/6 of the thrusters will be small, 2/6 will be medium, and 3/6 will be large.

The directions of the thrusters are also weighted randomly, so that 5/8 are placed pointing backwards and 1/8 are pointing in each of the other three directions.

Aside from those random weights, there is currently no additional logic (besides randomness) to determine where the thrusters are placed. Even so, randomly-generated ships usually have reasonably well-balanced thruster placements simply by virtue of random probabilities.

Stage 8: "Weapons"


The placement of weapons works almost identically to the placement of thrusters, but with different sizes, scores, and random distributions. (In this case, there are only two sizes of weapons, and their rotations are distributed more evenly around the ship while still favoring weapons that face forward.)

The one algorithmic difference between thrusters and weapons is that, when choosing a location for a weapon, the algorithm will choose the location that is farthest away from the center of the ship in the direction that the weapon is facing.

Stage 9: "Exterior Armor"


Once all the exterior systems (weapons and armor) are placed, a single layer of armor is placed around the perimeter of the ship on any tiles that are already occupied by a weapon or thruster, so long as placing an armor tile there will not block and crew paths according to the above "Path Contiguity Checking" algorithm.

Stages 10 & 11: "Ammo Supplies" and "Power Storage"


Next, Ammo Supply and Power Storage parts are placed. In this case, between 2-3 ammo supplies and 1-2 power supplies are added to the ship.

The algorithm that places these parts attempts to place them in locations that are nearby as many ammo-consuming or power-consuming parts as possible. In the case of ammo supplies, the algorithm will attempt to place them near as many weapons as possible, so long as those weapons aren't already near other ammo supplies. And in the case of power supplies, it places them near thrusters and ammo supplies (which use power to create ammo), so long as those thrusters and ammo supplies aren't near other power supplies or the reactor.

Stage 12: "Crew"


Finally, crew's quarters and bunk rooms are placed in the remaining empty areas. Their placement is completely random, except that the algorithm tries to line up the edges of the rooms if possible, which tends to cause crew's quarters and bunks to be placed adjacent to each other.

Stage 13: "Fill With Armor"


Once all of the crucial rooms and systems have been placed, the almost-final step is to fill any remaining space with armor tiles, because having armor throughout a ship makes it generally harder to destroy.

In order accomplish this, every single empty tile is scanned using the above "Path Contiguity Checking" algorithm to determine whether placing armor there will block any crew paths. If no crew paths will be blocked, then an armor tile is placed.

The neat side-effect of placing armor in this way is that corridors, like the ones you see above, are naturally "created" as a simple by-product not placing armor in locations that would block crew paths!

Stage 14: "Add Extra Doors"


The one final-final step is to place any extra doors in locations that would make crew access significantly more convenient. This is accomplished by scanning every wall location where a door could be placed (but isn't already there) and doing a path search from one side of the wall to the other. If the resulting path is over a certain distance (in this case 10 tiles), then a door is placed to make the path shorter.

In the above screenshot, I can only spot one additional door that was added -- in this case, on the right side of the medium-sized thruster on the bottom of the ship.

Sunday, September 1, 2013

StarWright build 2013.09.01

No major new StarWright news, other than that I have just posted a new build of the game that shows off the starship designer, ship combat, and multiplayer!

Download it from here: http://starwright.waltdestler.com/